Showing posts with label tests. Show all posts

Monday, April 6, 2015

Rendez-vous with PMC Sterling :-)


Yes, I know, I am behind everyone when comes to sterling silver clay :-). I guess it's simply because we don't have PMC distributor in Poland (anyone interested? ;-) ), so I rather stick to Art Clay. But last year when I got Rio Grande gift certificate for Saul Bell Design Award, I decided to spend it mostly on something that is not so easily accesible in my country, so PMC Sterling and Argentium :-). I already played with Argentium a little bit (fun!), but sterling clay was waiting and waiting... Finally I decided to try it.
Sooo, my plan for this post is to write a little bit about how did it go ;-).


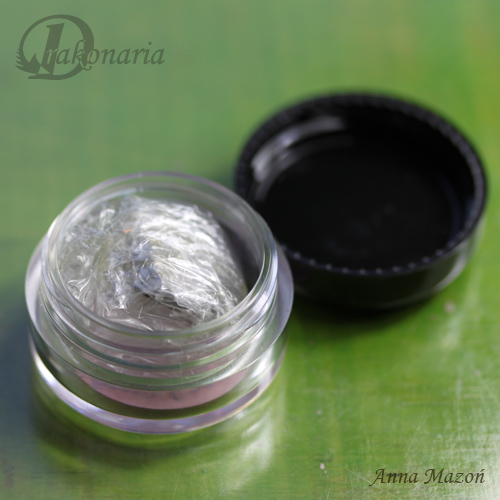
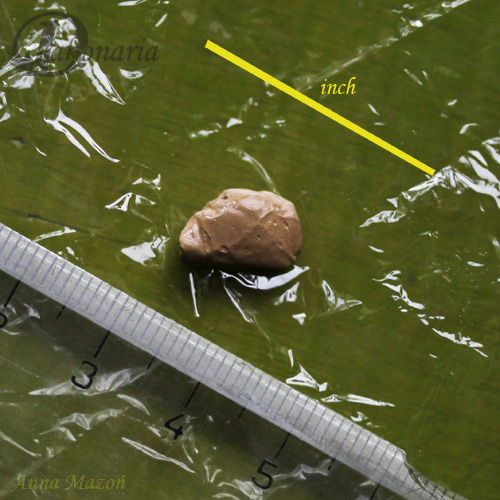
Generally - I like the texture of this clay when it's wet - it's super fine,  quite similar to PMC3 - a little bit like a bubble gum :-) (if compared to Art Clay). Long working time, darker colour than fine silver clay - blablabla everyone already knows these things -  a lot of really great tests were published in various places.
What surprised me was how dried clay behaves. This material is undoubtedly designed for carving, and I don't really carve. I file. So at the beginning I was super annoyed by the fact that this clay, even when it's dried, is a little bit "buttery" and it clogs files immediately. So, in a way, I was forced to change my way of working, especially for this clay, but you know what - at the end I don't mind it. I learned a lot.


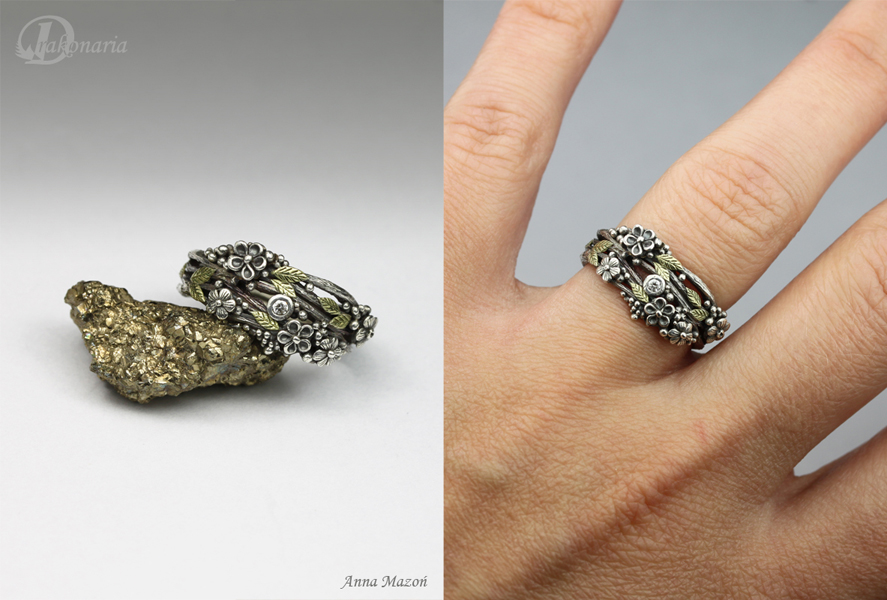
Another thing that I don't like is high shrinkage rate - I really don't need my pieces to become smaller. I can live with 10% of fine silver clays, but 20% is a little bit too much. And it comes with a price ;-) - bigger distortion. It turns out that it's not a problem in case of more or less flat pieces (all the pendants were ok), but in case of rings it is an issue. I had to reshape all the rings that I made so far, to make them round again after firing. I'll have to try firing plugs, but I don't like using additional stuff in firing process.


Yeah - as for the additional stuff - after a few first firings that left some carbon marks on backs of my pieces I learned (thank you Terry Kovalcik and Ros Wood! :-) ) that it's better to arrange firing in such a way that pieces don't have any direct contact with carbon - so cover them with a stainless steel mesh or something like that. With those first pieces I also tested soldering traditional sterling to fired PMC Sterling, and it works ok.


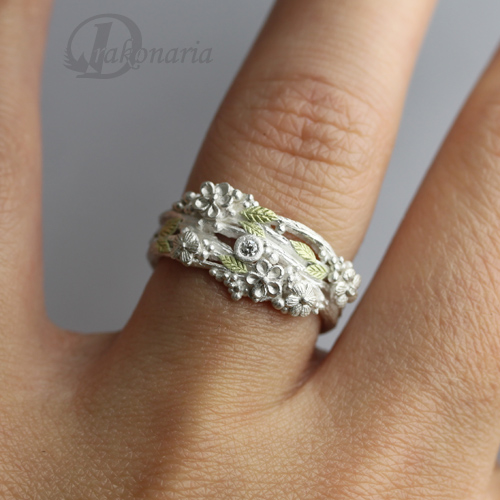
It seems that yes, this clay has its cons - no doubts about that -but the strength - it makes up for everything, and that's the reason why it's definitely not the last time I am using it. I want to use it more, especially for rings, but first I have to solve the distortion problem.

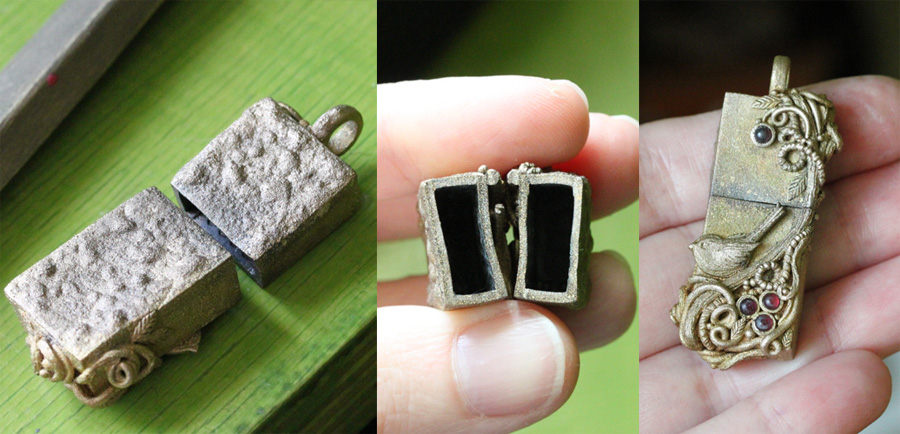
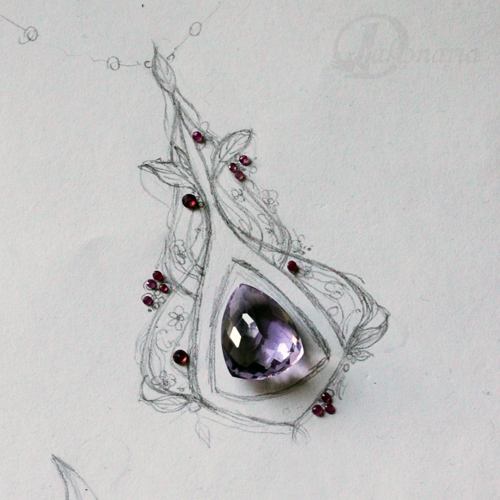
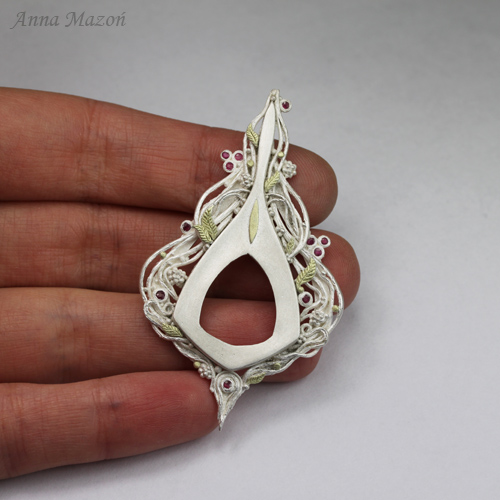
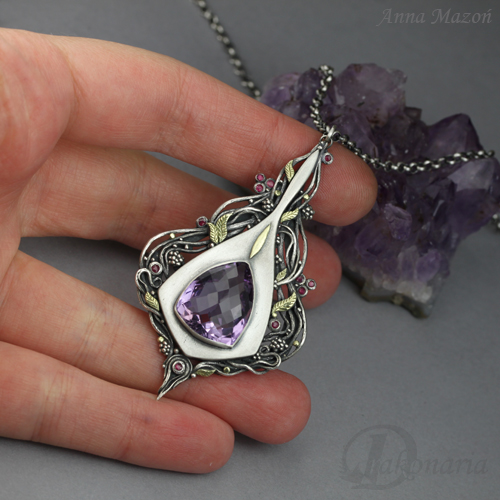
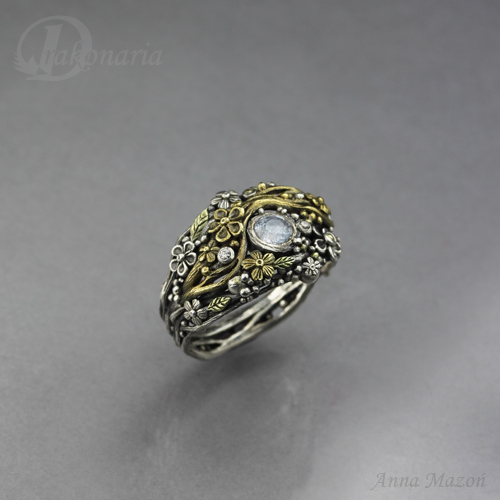
Here is another example of PMC Sterling work, mixed with sterling sheet and wire (the stone setting, bail behind it etc.) - "Dream Keeper". I cut sterling sheet in a shape which fitted exactly in between the ornaments on the back of the pendant, so it was easy to solder it. Then I soldered prongs on top of it and a bail on the back. It worked nicely.


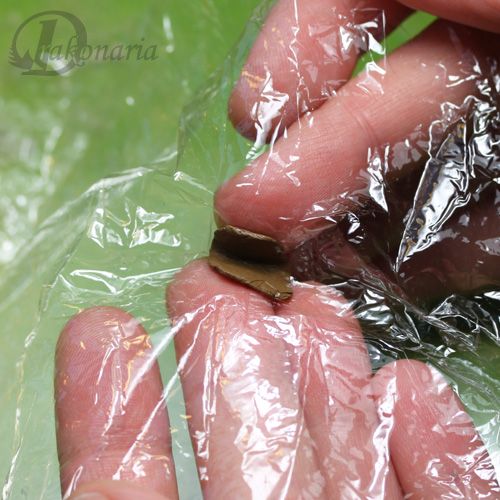
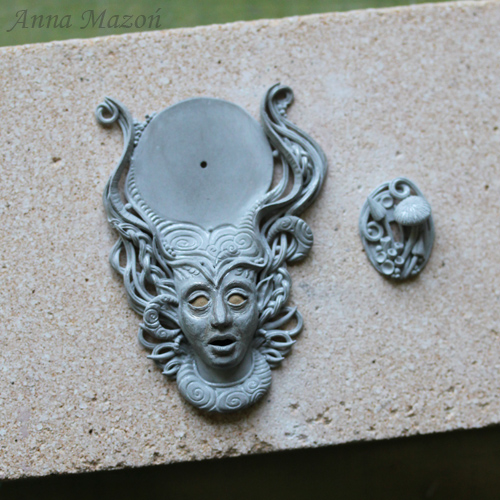
If you are curious, here you can see a few steps of making my "Drawing down the Moon" pendant (the first photo), inspired by a Full Moon ritual. Someone asked in one of the internet groups, where did I get the mould ;-))))))), so I just thought that it might be interesting to show the process at least partially.

Here you can see some progress of making the face. I work mostly in an additive way. Then I take away some clay in "strategic" places ;-) with a file. I don't use any fancy carving tools etc. People who attended my classes know that I have just two favourite tools - something for cutting and a pointy file - this would be all.

Some more details. I didn't do anything to the face from that point - I was quite happy with the expression. I am still learning how to sculpt human faces and there is still a long way to go, but I feel I am finally starting to think about expressions and not only "how to make a face that looks more or less like a face" ;-).

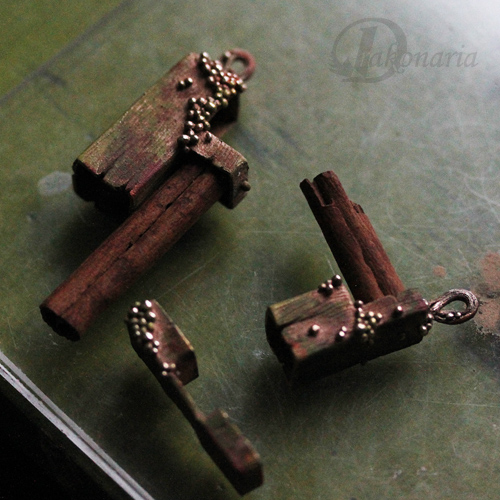
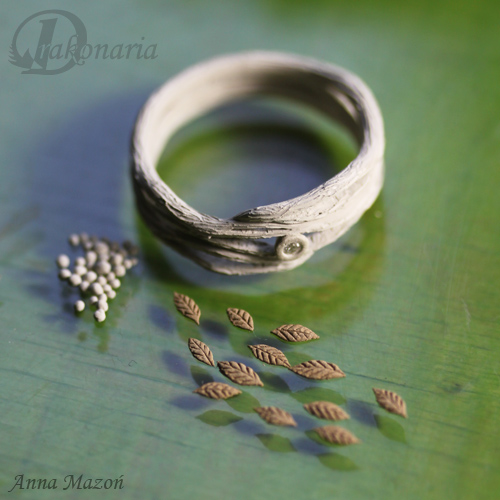
Details, details. It's like building a tiny model :-). Adding a little bit, filing off a little bit. It's not easy, and it's not fast, but I think it's worth it. I just love this complex, three dimensional look I can get this way.


And some more building and filing - the piece might look quite openwork and delicate, but you might notice that each element is attached to something, really firmly, at least in two places.


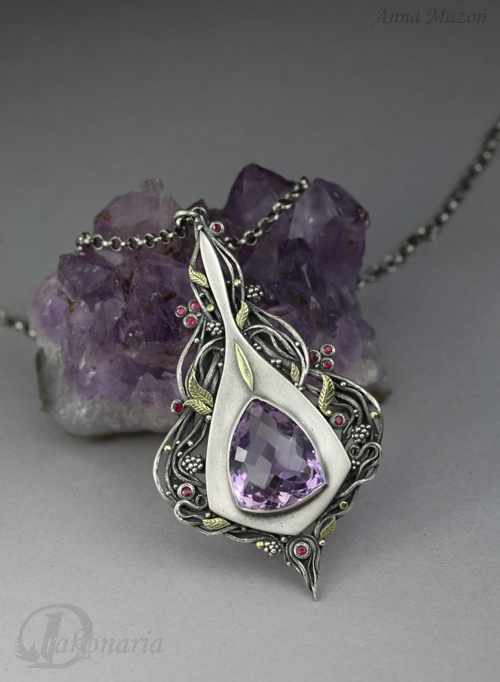
Almost ready. I just added a little bit of 18K green gold inside the eyes - I wanted to create this feeling of her being "filled" with the Moon, with this otherwordly shine in her eyes :-).
And it was ready for firing. It turns out that manufacturer's schedule works just fine in my kiln, so I fired all my PMC Sterling pieces in two phases - first open shelf 538 °C for 1 h, and then buried in carbon 815 °C. for 1-2 h (depending on the size of the piece). After getting some marks from carbon in my first firings I make sure that I have some ceramic paper under the piece and stainless steel mesh above it. I don't mind quite long firing time at all - especially if I work on a piece for a few days. But I understand that this might be annoying for people who make a lot of simpler pieces.

Because of the green gold addition, in this particular case I repeated the second phase of firing twice. According to the manufacturer (Michelle :-) ), it requires double firing. You can read more about this material here. And I guess that this would be all for today ;-).

Thursday, November 6, 2014

Flash drive enclosure kit - (mini) test :-)

I should have written this post a long time ago (I think I have this kit for a year or so ;-) - I got it from metalclays.com ). I just really wanted to try it with different metal clays, different types of ornamentation and time flew by... So let me share with you a few of my thoughts  and in-process pictures, of using this flash drive enclosure kit. In this photo you can see all three flash drive pendants I made so far. Each one made of different metal clay - Art Clay Silver, Goldie Bronze and Noble Clay (Classic Colour).


Here you can see what you actually get. Two blue parts for making walls of your flash drive enclosure, pink mould for making plugs which help to keep both parts of the pendant from shrinking too much, white investment powder to make the plugs, a magnet (for a closure) and a USB flash drive.
On their website you can also find quite easy to follow, very detailed instruction, and even a few videos.


The first part of the whole process is making the walls. You just have to roll out the clay into that big, blue mould. At this point, while the clay is still in there, you can add some textures - they will be visible on walls of your enclosure. Cool, but I'm really not into textures and I already knew that I wanted to make a sculptural piece, so I just left my walls smooth.
At this point it is very important to follow the instructions about when to remove the walls from the mould, because it really makes a difference (walls fit better to each other). This is also the moment when you realise how much clay this project requires and you start regreting that you decided to make the very first test piece in silver ;-).


After cleaning edges of the walls (honestly this was tricky - I filed them a little bit too much and changed the angle of the edge, which originally was 45°...) you put them together, simply with a bit of paste. This blue cradle makes things much easier. First of all it helps with keeping 90° angle between the walls. You can also notice in the photo that inner surface of each wall has a lot of little holes (they are here to save some clay) and letters, which indicate what goes where - A to A, B to B etc. etc. It takes quite a lot of time to put the whole box together, because ideally after adding each wall you have to wait till the new joint dries.
If you applied some textures on the outer surface of the walls, watch out not to stain them with paste - I had quite a lot of paste on the other side of the seam.


On the side of the cradle, through a little "window", you can check if your walls really fit well together. I have to say I liked this detail.


Here you can see how my first assembled box looked like. It definitely wasn't perfect - the edges weren't super crisp - I had to file them a little bit. I also had to patch a few places with paste from the outside. If I applied a texture on the walls in the first step, this wouldn't be so easy. I would probably destroy the pattern a little bit with all that filing and adding paste.


Then I took out my magic wand, and I made my little elves work... HARD ;-). And here is what they made - my flash drive enclosure was almost ready for firing.
Being more serious - at this point you can embellish your box any way you want. My pendant was inspired by a Norse sea goddess - Rán. I just formed and carved each detail using two of my favourite tools - a scalpel blade and a round, pointy file.


There is one more thing you have to make before firing - the plugs. Just mix a little bit of that white powder with water and pour it into these pink moulds. Now I know that it's a good idea to do this BEFORE you even start working on your pendant. These plugs dry quite slowely and they have to be really dry before you put them inside both parts of  the box.


And here is my flash drive enclosure ready for firing with both plugs inside. You can see a part of the plug in the smaller piece. The second one is almost fully inside. Then  I just followed my usual firing schedule for Art Clay Silver (full ramp to 800° C, hold for 2 h).


After firing and some finishing the pendant looked like this. I was really happy with the final result BUT the thing is, that I had to do A LOT of post firing filing. The plugs didn't really prevent the clay from shrinking too much - the USB flash drive didn't fit in there at all. My theory is that the kit is rather meant for texture-type embellishment, and I added a lot of additional clay on my box. It's probably exactly as it is with rings - heavily embellished, sturdy rings seem to shrink a little bit more than thin, delicate ones. I'm also always aiming for the highest shrinkage possible with my firing schedule - I fire long and hot. It's just a habit connected to the fact, that a lot of my pieces are delicate and openwork, and I need the material to be strong. So - the kit worked ok, but some additional work was necesarry.


Later I decided to test the kit on a different clay. I got a few types of Noble Clay to try, and after one test firing (now I know I should have made more tests...) I decided to make something more serious than just a test strip. Following the instruction once again I made this flash drive enclosure. I have to say, that this time, with some experience from the first trial, it was faster, easier and the result was more precise.


Imagine my disappointment when after firing I saw this... Actually at first I saw the top of my enclosure which was fine, but when I turned it over I saw all these blisters (back was originally flat and smooth). There was also a lot of distiortion. It was very interesting, that the top was ok, but the back was basically melted.


Again - I did a lot of filing, tried to make it straight again (which was super hard), and I left the back the way it was - I just polished it (funny thing is that the person who owns this pendant, actually said that this back looks very interesting ;-) - everything is a matter of taste ). Well - honestly I was quite annoyed, and I haven't used Noble Clay anymore from that moment :-))))))). One day I will - I still have a few packages, but I have to be in a right mood for further experimentation.


For my last experiment with that kit I used Goldie Bronze. The construction of the box was easy peasy this time - I already knew very well how to use this kit.
I added some intricate, sculptural ornamentation, and fired it the way I usually do (350
° C on top of carbon for 1 h, and 825° C for 1 h with more carbon and closed lid).


This time everything went ok, and the flash drive fitted inside - I guess it's because Goldie has such a low shrinkage rate. So here it is ready. It was inspired by a visit in Josephine Wall gallery in Poole, last year.


Ok, so here are my general thoughts:

-
Flash drive enclosure kit is definitely a smart tool.

- Follow instructions really carefully, otherwise it won't work precisely.
- If you fire to the highest shrinkage and /or add a lot of additional clay on top of the boxes, be prepared for a lot of post firing work. The  flash drive probably won't fit inside (I guess in my case I should try with Art Clay Silver that version of the kit, that is meant for PMC, which has higher shrinkage rate).
- The price is high, so I guess I would rather recommend this kit for people who really plan to use it a lot. I saw some wonderful flash drive enclosure pendants, that were adorned mostly with texture sheets and didn't have any issues with too much shrinkage (Inge Verbruggen uses this kit very successfully).

- Yes, it makes things easier and faster, but of course you can construct this kind of a box without help of any kit. It's just about saving time, and not everyone is great with construction.
- Will I use it again? Probably yes. But only with Goldie. I spent too much time filing silver one, and next time I'll just construct the boxes my own way, and make my own calculations, to be sure that after firing everything will fit ok.

Thursday, February 14, 2013

Riveting - after workshops in Warsaw :)

 The workshops in Wytwórnia Antidotum jewellery making school were really great :). Quite surprisingly, the most interesting thing I learned there was riveting. Well, I generally knew how does it work, but I've never tried it before and it's always about details, not "general knowledge" ;). Here is what I did - pure work of art, isn't it? ;)))))))))). Thanks to this utterly ugly piece I practiced two types of rivets - "normal" ones and stilt rivets.

I also saw a lot of scary, huge machines ;). I mean professional jewellery making equipment :). I was really startled by the fact that these things are usually so specialized... I saw special tool for cutting pieces of tubing (!!!), special tool for making dome shaped pieces of metal sheet, special tool for cutting circles (seriously? :))))... If I wanted to have fully equipped, traditional workshop I would need another apartment to put all these things there. Yes. I know. It usually works exactly this way. I'm simply quite an anti-tool person. I usually have as few things as possible. Generally my hands are my best tool. I guess it only shows how unprofessional I am ;).


But of course I'm really happy I was there, learned a lot of new things and met great people (huge thanks to the teacher of our group - Remigiusz Grodzicki). It was a wonderful experience and I wanted to try my newly acquired skills as soon as I came back to Cracow. And here is what came out of it. It's a ring with hidden rivets.

This enamelled "bowl" part with sculpted flowers is made of silver clay, and band plus stone setting is made of regular silver sheet.
Below you can see how I made it.


First of all I made this element out of Art Clay Silver. This was also the first time I worked with "the new formula" which recently hit the market. I got a package from my wonderful supplier - Planetart. Honestly I'm a bit dissapointed. Yes - this new formula is softer, has great workability, longer working time, is a bit more like polymer clay or a bubble gum ;) etc. etc., but for me Art Clay Silver became second PMC. And I don't like this. I really liked to be able to choose. Art Clay was better for filing, but worse for carving and PMC quite the opposite. Now there are two brands of silver clay that are great for carving, but non of them is good for filing. The silver lining is that I recently really like to work with PMC3 (which isn't available in Poland) and now I won't have to buy it abroad. Art Clay will do just fine. But enough about the clay.

As you can see, the piece in the photo is already fired. I made two holes for future rivets before firing and used wet packing technique to put white enamel on its surface.

And here is the piece after firing enamel and oxidizing. I also tried another new thing here. I found on Vickie Hallmark's blog an information that it is possible to use a pencil to create sketches on enamelled surface. It really works and I love it! It was the first time I tried it, so it isn't exactly what I intended, but I will definitely practice this technique.


Then I made an irregular band out of silver sheet and drilled two matching holes in it. Why two and not just one? I wasn't so sure about my riveting skills, and I was afraid my ring would spin. So I decided to make two rivets instead of one, to constrain potential movement.
Then, also using silver sheet, I made a bezel cup with corresponding holes in its base...


...and riveted the hole thing :). Fortunately it turned out nothing was moving and my rivets were very tight.


Finally I set a stone (it's a citrine - with faceted front and flat back), made some finishing and the ring was ready :).
I'm totally in love with white enamel. There is something so pure and magical about it. It is simply inviting to "spoil" it ;). With a sketch, with a drop of colour... Just like a blank piece o paper :).

Ok, enough for today. Ah, and one more thing. If you want to read some more of my blabbing ;) check the latest newsletter of Metal Clay Academy. I was honoured to be chosen as a Featured Artist there. I'm really happy about this :).

Friday, January 25, 2013

Something nice, something interesting, something weird ;)

First of all our jewellery auctions for The Great Orchestra of Christmas Charity were very successful :). We collected almost 19 000 PLN (which is over 6000 USD). And The Orchestra, during The Grand Finale, collected in the whole country almost 40 millions PLN (which is about 13 millions USD :) ). It was great to be a part of this. So this is "something nice" :).

The "something interesting" is my article in the latest issue of Metal Clay Artist Magazine (well, I hope it is interesting ;) ). Some time ago I made this dragon pendant with a moonstone as a custom order and took a lot of photos of the whole making process. I decided it would be nice to write something about this. Originally I showed it only to the girls from Etsy Metal Clay Team, but Joy Funnell told me it would be a good material for an article. Thanks Joy! :) So here it is :). If you haven't read this MCAM issue yet, check it out. There is a lot of interesting things in there. My personal favourites are Michael Sturlin's article on time management, Wanaree Tanner's "how to" on sterling silver clay ring and an interview with Evelyn Pelati Dombkowski.


And as for "something weird" - this is a longer story ;). A few weeks ago I was invited to a free metalsmithing jewellery workshops organized by Wytwórnia Antidotum (jewellery making school based in Warsaw). I chose a class on casting and it will take place this weekend (can't wait!), but the fun began sooner ;). The official invitation I got by mail was everything but ordinary.
As you can see in the photo, it was a lovely wooden box, with a few weird things inside: a piece of aluminium mesh, a circle made of plexiglass, a cinnamon stick, playing card and a glass cabochon. There was also an instruction saying that I should choose at least two of these things, add anything I want and make this way a wearable piece of jewellery :). Just for fun!

I immediately had a few ideas, but finally I drew this and decided to use the cinnamon stick and aluminium mesh. The cinnamon stick because I liked it the most from the very beginning and the mesh, because it was so ugly I just felt I needed to do something to make it easier on eyes ;D. This project was totally not "me", but I just wanted to have some fun, so why not? :)


I chose to work with Goldie Bronze ™, simply because it's relatively cheap (so I wouldn't feel remorse that I'm wasting materials just to play) and I needed something warm-coloured for that project.
I constructed  a few cuboids, that I planned to put together in three segments that would form three parts of the pendant. I wanted them to be rather rough and slightly irregular.
Later I removed excessive clay with a file, added some texture and granulation. I also chipped them a bit...


After firing and some finishing they looked like this. I decided I would try something new for finishing touches and finally test Vintaj Patinas I bought some time ago. I used three colours - moss, cinnabar and rust. I used them for the first time, so I didn't do it really "professionally", but I guess I can say something about this product. Generally I like these patinas, but to be honest I wouldn't call them patinas. These are just cool semi-opaque paints for metal, that stick really well to its surface, are water resistant and generally durable. They look really nice and I already can see that it is possible to create very interesting effects with them, but this never will be a real patina look. They don't react with metal, they just cover it, so the look always will be different. But I still like them very much! I just wouldn't call them Vintaj Patinas, but Vintaj Metal Paints :).


Then I began assembling the whole thing. I cut the cinnamon stick into two pieces (I used a piercing saw for this) and put them in the right places (yes, I used epoxy glue for this, and yes, I'm very ashamed of this ;) ).


I needed two more cuboids I planned to make of aluminium mesh, but finally I decided I would also use the playing card from the wooden box. As you can see I just folded it and scotch taped it from the inside. Later I made the same shape from the alumium mesh.


And here you can see the finished pendant. I used Vintaj Patinas again on paper and mesh cuboids.  I painted the inner surface of the mesh with "rust" and the outer with "moss". It looks quite interesting when you can see orange colour peeking out from behind the green. I applied the same colours on the surface of the playing card cuboid. I just irregularly layered them one on top of another. When patinas dried I covered them additionally with glossy decoupage lacquer to make the cardboard cuboid more durable and harder.

So here it is :). I would never make something like this normally, but I have to say I had a lot of fun, I learned a lot and I got inspired! I will definitely make something else with cinnamon sticks (this time something more consistent with my aestethics ;) ). This is a wonderful material. Its texture and colour is so beautiful and the smell is heavenly :).

Saturday, November 24, 2012

Green gold - REALLY? WOOW!!!


This was my first reaction when Michelle Glaeser asked me if I wanted to try her green gold clay. Green gold? Really? WOOOW!!! Of course I wanted to try it! With all my leaves, flowers and other organic ornaments, this was a dream come true, so I was waiting for a package with this precious material like for a birthday party ;).

Generally, I have to say I'm VERY impressed by this clay, how easy it is to use and how dramatic the final effect is. In my opinion it is extremely beautiful and unusual way to embellish a piece.
Below you can find photos of three projects I made with addition of this clay, and notes on what I learned while making them. So let the story begin :).


I got from Michelle about 0.7 g of her 18 K green gold clay, which is a bit less than a half of a regular batch she sells. 0.7 g... Right. I was just hoping I would see this batch without a magnifying glass ;).
When the package arrived I opened it holding my breath ;) and  found this cute little jar, with clay wrapped in a kitchen plastic foil inside.


When I unwrapped the foil I immediately felt a smell of SO beautiful essential oils. Something like rose, sandalwood... Generally lovely, oriental fragrance. I'm looking at my notes, and I see I wrote down, that it smells like an India shop :). But it is seriously very pleasant and so unexpected. You get gold clay smelling like roses :). How cool is that?

The clay was very moist, but it had a bit uneven texture so I kneaded it for a while. I decided that the best way was to make it through the foil it came in. I didn't know the texture of this clay yet and definitely didn't want to end up with all I had stuck to my fingers. This way I got totally not sticky, perfectly moistured, smooth clay very quickly and without any stress.


Here you can see the size of the batch I got (less than a half of regular batch). It's light brown, not green at all. It may be surprising, but this gold turns green during sintering process. It's Michelle's secret how does this exactly work :).

As you can see the batch isn't big. At least I thought so, until I started working with it. I know it may sound unbelievable, but it's actually a lot of clay. I was sure I would use all the clay I had for the first ring I wanted to make. But it turned out, that I used about 1/3 of the batch and made twelve, quite big leaves. Overall I made, out of this one 0.7 g batch, 26 leaves and 12 balls which I used in three projects, and I still have a tiny bit of the gold left. It is simply because when you work with so precious material, you rather work small and smart.


The first thing I wanted to make was a silver twig ring, with a diamond, some flowers and green gold leaves. It was a whole "for the first time" experience. I used here PMC3 (and I've never used any kind of PMC before - we only have Art Clay distributor here in Poland), for the first time fired a diamond and, last but not least, for the first time I used this 18 K green gold.
I just put everything together with silver paste. Yes, you can fire this green gold with silver, simply greenware to greenware. Just put all elements together with silver paste, but make sure not to stain with silver paste any gold surfaces that will be visible. The clay dries quite slowely and has great workability.

 Then I fired the ring. This gold can be fired in three different ways.
1. It can be torch fired, I haven't tried it though.
2. It can be fired in a kiln
3. It can be fired in a kiln in activated carbon

For this ring Michelle recommended the third option - firing in activated carbon - because of the diamond. It would be probably destroyed in any kind of open air firing. It is generally believed that fine silver clay needs to be fired in open air, but Michelle Glaeser found out that fine silver gets full shrinkage after 2 firings in carbon. She recommends 1505 ºF (818 ºC) for two hours, bring down to 200 ºF (circa 100 ºC), then fire again 1505 ºF for two hours.  This 1505 ºF is a minimum temperature for the green gold, but you can go higher. What can I say - it works.
You can see in this photo how does green gold look like right after firing. It's already green - nice, light shade of green.


Here you can see, that, as expected, green gold doesn't react to LOS patina. It stays bright and clean against dark surface of oxidized silver.


And here you can see how the ready ring looks like. I made one photo with a piece of pyrite, to show a difference in colour between this yellow gold tone of the stone and greener shade of green gold. It can be easily polished with any tools you use for silver.


Then I decided to make something bigger, and more complicated. I made a rough sketch of an openwork pendant, a bit inspired by Art Nouveau, with faceted rubies, amethyst and green gold detailing (leaves, balls etc.).


Here you can see the pendant ready for firing. It had a lot more of green gold than the ring. I made some bigger leaves and balls. I had to work smart here and for example I flattened the balls to give them bigger, visible surface. Leaves are also made in a special way - they are green gold "doublets". I didn't want to make them too thick (it would be a waste of gold), so I paired them with silver leaves of exactly the same shape. I glued them together with silver paste, and added this strong, thick pieces to the pendant.


This time there was no need for carbon firing, so I fired the pendant simply in a kiln. I used generally the same firing schedule as previously, but went a little bit higher - 1540 ºF (838 ºC) for two hours, bring down to 200 ºF (circa 100 ºC), then fire again 1540 ºF for two hours.
The pendant came out of the kiln just perfect. You can see here again the shade of green gold right after firing.


I soldered a bezel for the amethyst and a jump ring, oxidized the piece, polished it partially and it was ready.


I'm pretty happy with the fact that this piece is both symmetrical and asymmetrical. I hope that this adds some movement and organic quality to the design. I named it "Once upon a time" ;). I'm still struggling with the chain... Maybe something else would be better. Originally I wanted to hang it on a strand of faceted amethysts, but it would be definitely too much.


Here is the last piece I made with green gold. Actually there is only a small addition of green gold in this ring (just leaves and a few tiny balls). It also contains yellow gold (22 K Art Clay Gold), silver (PMC3), two diamonds and lovely pale sapphire. You can see here the difference between 22K yellow gold and 18K green gold. In the next post, dedicated to yellow gold, I'll show you a few photos I took while making this piece. It was really great mixed metals fun :).


 Like I said at the beginning, I really love this green gold clay by Michelle Glaeser. The final effect is simply fantastic and I appreciate the fact it can be fired in every possible way. It's also wonderful that it can be joined with silver  greenware to greenware. Basically it has fine silver's simplicity of usage, but it brings to a piece truly precious quality.

Here you can find Michelle's blog: http://rosegoldclay.blogspot.com/
And here you can buy the clay: http://www.etsy.com/shop/mfglaeser