This is a really long post, but I hope that it may be useful for someone :). A few months ago I had an opportunity to try for the first time
Waldo Iłowiecki's new bronze clay -
Goldie Bronze ™. While working with it I made a ton of notes and photos, so I decided to write something more about it here.
Goldie Bronze ™ comes in two types of powder - soft and hard. It contains approximately 90% copper and 10% tin. I tested the first one so far. Soon I'll test hard type also.
When you open a container the clay looks like this. I was quite
surprised when I saw this white powder not entirely mixed with brown
powder, but now I know this totally doesn't matter. You just have to
jumble it up a bit.
Similar like in the case of Hadar's clays, you have to add water to the powder to get workable clay. Many people stress that you should use distilled water, but I'm fortunate enough to have tap water which works great with all types of clays. You can see in the photo that I added far too much water - the clay doesn't look too pretty at this stage ;). You can already see that the colour of Goldie Bronze ™ is quite light. It's like café au lait ;).
Waldo stressed in an instruction I get from him, that to get smooth consistency, the clay should be kneaded very well, and the best way is to roll it thinly and fold it over several times, then roll again, fold over etc. As you could see above, my clay was far too wet, so each time I rolled it I let it dry for a while. This way it lost surplus water quite quickly.
Generally I had no problems with getting smooth, nice and totally not sticky constistency. It was my first trial with clay in a powder form and I was afraid that making workable clay out of it would take ages and I would have a lot of problems. I was nicely surprised than it wasn't too painful :). At this stage I already noticed that this clay is totally different to the touch than other clays I've tried. It's a
bit velvety, a bit like something made of silicone. This is actually very nice, because
you REALLY don't need olive oil or any other hand conditioner to work with it.
Then I actually begun working. I decided to make three pieces, each for different purpose:
- flat pendant with sculpted tree - I wanted to see if this clay is appropriate for very detailed, hand sculpted work I usually do.
- twig ring - I wanted to check how does this clay work when used to make thin, open work, carved pieces, what is its shrinkage rate in case of rings, how would zirconia fired in place react.
- 3 dimensional triquetra pendant (it's a box with an open back - it's not visible well in this photo) - I wanted to check if schrinkage is the same in all directions (it's, for me, the biggest problem with Metal Adventure's BRONZclay™), I wanted to check how does this clay work with molds (I used here a mold made from a pendant I made once in silver).
I also made three test pieces to destroy after firing - thin coil, flat circle (3 cards thick) and flattened ball (approximately 5 mm thick).
Goldie Bronze ™ is definitely
very pliable, very soft, even a bit "loose" (that's why there are two versions - soft and hard which can be mixed together if needed). It's surely
PERFECT for molds. Working with it was very pleasant, especially the fact that I didn't have to use hand conditioner. This clay is so unsticky, that there were even a few moments I had an impression of it sliding on my fingertips and on my working surface - it can be a problem when you make for example very thin coils and you need some friction. But as you can see above it isn't something that can't be overcome when you know this clay better.
It is also a bit "sandy" - if you have very good sight you can see its sandstone-like structure, especially when it's dried. Look at this macro photo. Despite this it can be smoothened quite easily with sand-paper, abrasive pad etc. While working
you can easily make paste out of a bit of clay, but you can also use water alone - it joins elements together as well.

Goldie Bronze ™
needs to be fired in two stages. First to burn out the binder and the second one to actually sinter metal particles.
- First stage - place the pieces in a stainless steel firing container on a layer of activated carbon. Put it without a lid into a kiln and fire at full ramp to 350°C (662°F). Hold for 30 minutes.
- Second stage - remove the container from the kiln and fill it with a layer of
coconut shell-based carbon to cover the pieces. Cover the container with a stainless steel lid and place it back into the kiln (just after taking it out - don't cool down the kiln, just continue with second stage immediately). Waldo recommends at this stage firing full ramp to 820°C (1508°F) and hold for 40 minutes. I slightly modified this stage
* and usually fire 800°C for 20 minutes and 825°C for 40 minutes. You can calculate that total firing time is relatively short - with the original schedule it is under 2 ½ hours! As you can see I had no problems with this first firing - all pieces came out of the kiln
undistorted, fully sintered and covered with beautiful kiln patinas (unfortunately these patinas aren't durable :( and if not sealed, they turn orangey-yellow in a few weeks).
Then I polished half of one of my test pieces - you can see here the colour of polished Goldie Bronze ™. It's very nice - bright gold. Lighter than colour of BRONZclay™ which is rich, deep gold (I love it also :) ). Goldie Bronze ™ is a bit more silver-ish and tarnishes a bit slower (yay!). Fired pieces are
surprisingly lightweight (at first I thought that maybe something went wrong during this first firing, but this is simply a feature of this clay). This is great, when making earrings -
you can make quite big forms and they still will be wearable. And another great thing - Goldie Bronze ™ has
very low shrinkage rate - my pieces shrank less than 6%! From
wonderful test by Pat Waddington I know that Goldie Bronze ™ can shrink much more (12%) when fired significantly longer and hotter (second phase with 2 hours hold), but with lower shrinkage it's still VERY strong (just look below).
After this I worked a bit with my test pieces. As you can see in the photo I bent my thin coil into a little ring -
without any breakage. Actually I was quite surprised. Then I tried to wad my flat circle, but I wasn't able to do it - I'm not strong enough. Finally my partner waded it using some tools. Again no breakage. Then I cut in half this flattened ball, to check if it's fully sintered inside - everything was ok (some darker spots are visible due to rough cutting surface). It seems that the clay is
very strong yet quite elastic.
I felt quite encouraged by all these results so I decided to make something more complicated what would be really hard test for this clay. I made delicate, open work bangle with tiny flowers. I was quite happy with how it looked like so I was really hoping for easy firing.
After the first stage the clay is supposed to turn black, but I saw the bangle's bottom part was still quite light. I thought I should flip it over and repeat stage one. Well - it was the worst idea ever. While flipping, the bangle accidentally hit the wall of my firing container and the piece broke into a few pieces... So -
NEVER move your pieces at this stage - let them be. Now I know that lighter colour after the first stage of firing is not a problem at all. I tried to take the bangle out of the container and repair it with fresh clay, but this was SO stressful! If I touched anything too hard it broke. Goldie Bronze ™ in this "black clay" form
after the first stage of firing is EXTREMELY brittle - you can easily make a black powder out of it between your fingertips, so really be careful and don't touch it if you don't have to.
After repairing the bangle I fired it again (I repeated both stages of firing), and it developed one big crack (actually it was quite surprising that only one, after being broke into so many pieces...), but the rest of the bangle sintered properly and places of repair were not visible.
I repaired this crack with fresh clay and fired it again.
Due to this "sandy" structure, I mentioned earlier, it is very easy to join fired elements with fresh clay - it "penetrates" fired surface and sticks to it very well. You definitely don't need oil paste or something like this - fresh clay and water based paste is enough.
These joinings are very strong - I tested it later.
So generally - thanks to this accident I had a chance to check repairing of Goldie Bronze ™ after both stages of firing.
In both stages it is totally possible to repair your piece with fresh clay or paste, but after the first stage (when the binder is burnt out, but metal particles are not sintered yet) it is simply more difficult due to brittleness of the clay.
This is how the bangle finally looked like. I decided to polish it only partially. It already found its new owner :). It came out quite interesting and very, very strong.
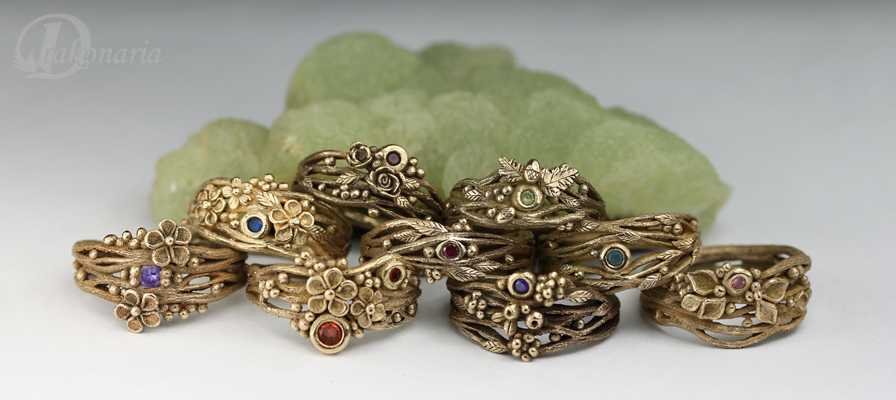
Here you can see a few more pieces I made with Goldie Bronze ™. A few "twig" rings with zirconias.
They shrank about one European size.
A bangle where I joined this bronze with Art Clay Silver (I fired the bronze part firstly and then added silver vines).
And some more twig rings (I love making them ;) ). I tested here different types of finishing. You can find some of the techniques I used here in my
tutorials in my Etsy shop.
Generally I really like this clay. It's very easy to work with (easy repairing after firing is simply wonderful thing) and it is quite different than other bronze clays. Definitely interesting experience. To be honest I totally switched to this bronze clay since I tried it. It has it's cons, but it's the best I've tried so far. I know. This sounds like advertising ;D.
* You ask why I modified the second stage of firing.
I made this change firstly
because I made also a few very big pieces (I haven't shown them anywhere yet - surprise is coming ;) ) and I wanted to be sure that the heat would reach inside
the pieces (that's why I made this additional 800°C
preparation for 20 min) and then I fired
for recommended 40 minutes, in 825°C
not in 820°C
simply because the firing range of Goldie is quite wide and with 5°C more I'm just on the safe side. The
original schedule also works very well. Goldie Bronze ™
creator - Waldo Iłowiecki - uses the original schedule to fire his big, sturdy bracelets and
everything is ok. I'm just overly cautious and want to be really sure
that everything will be properly sintered.
By the way - check great test of this bronze by
Sabine Alienor Singery. There is version for English and French speakers :).


