The workshops in
Wytwórnia Antidotum jewellery making school were really great :). Quite surprisingly, the most interesting thing I learned there was riveting. Well, I generally knew how does it work, but I've never tried it before and it's always about details, not "general knowledge" ;). Here is what I did - pure work of art, isn't it? ;)))))))))). Thanks to this utterly ugly piece I practiced two types of rivets - "normal" ones and stilt rivets.
I also saw a lot of scary, huge machines ;). I mean professional jewellery making equipment :). I was really startled by the fact that these things are usually so specialized... I saw special tool for cutting pieces of tubing (!!!), special tool for making dome shaped pieces of metal sheet, special tool for cutting circles (seriously? :))))... If I wanted to have fully equipped, traditional workshop I would need another apartment to put all these things there. Yes. I know. It usually works exactly this way. I'm simply quite an anti-tool person. I usually have as few things as possible. Generally my hands are my best tool. I guess it only shows how unprofessional I am ;).
But of course I'm really happy I was there, learned a lot of new things and met great people (huge thanks to the teacher of our group -
Remigiusz Grodzicki). It was a wonderful experience and I wanted to try my newly acquired skills as soon as I came back to
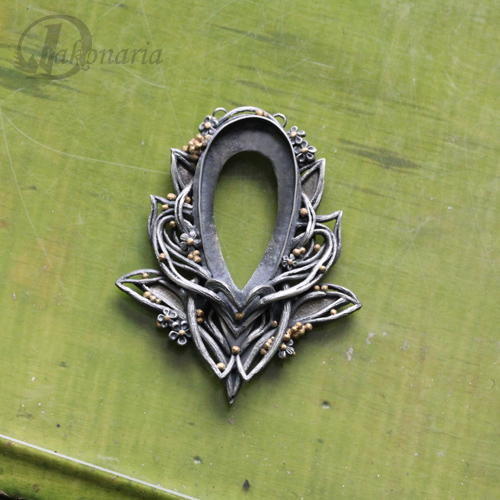
Cracow. And here is what came out of it. It's a ring with hidden rivets.
This enamelled "bowl" part with sculpted flowers is made of silver clay, and band plus stone setting is made of regular silver sheet.
Below you can see how I made it.
First of all I made this element out of
Art Clay Silver. This was also the first time I worked with
"the new formula" which recently hit the market. I got a package from my wonderful supplier -
Planetart. Honestly I'm a bit dissapointed. Yes - this new formula is softer, has great workability, longer working time, is a bit more like polymer clay or a bubble gum ;) etc. etc., but for me Art Clay Silver became second PMC. And I don't like this. I really liked to be able to choose. Art Clay was better for filing, but worse for carving and PMC quite the opposite. Now there are two brands of silver clay that are great for carving, but non of them is good for filing. The silver lining is that I recently really like to work with PMC3 (which isn't available in Poland) and now I won't have to buy it abroad. Art Clay will do just fine. But enough about the clay.
As you can see, the piece in the photo is already fired. I made two holes for future rivets before firing and used wet packing technique to put white enamel on its surface.
And here is the piece after firing enamel and oxidizing. I also tried another new thing here. I found on
Vickie Hallmark's blog an information that it is possible to use a pencil to create sketches on enamelled surface. It really works and I love it! It was the first time I tried it, so it isn't exactly what I intended, but I will definitely practice this technique.
Then I made an irregular band out of silver sheet and drilled two matching holes in it. Why two and not just one? I wasn't so sure about my riveting skills, and I was afraid my ring would spin. So I decided to make two rivets instead of one, to constrain potential movement.
Then, also using silver sheet, I made a bezel cup with corresponding holes in its base...
...and riveted the hole thing :). Fortunately it turned out nothing was moving and my rivets were very tight.
Finally I set a stone (it's a citrine - with faceted front and flat back), made some finishing and the ring was ready :).
I'm totally in love with white enamel. There is something so pure and magical about it. It is simply inviting to "spoil" it ;). With a sketch, with a drop of colour... Just like a blank piece o paper :).
Ok, enough for today. Ah, and one more thing. If you want to read some more of my blabbing ;) check
the latest newsletter of Metal Clay Academy. I was honoured to be chosen as a Featured Artist there. I'm really happy about this :).