Wednesday, January 7, 2015

The Great Orchestra of Christmas Charity

It's this time of a year, when I can proudly say:

"Hello, my name is Anna Mazoń. I'm one of 500 people who are involved yet again in an amazing initiative called Jewellery Makers for the Great Orchestra of Christmas Charity."

Actually I said exactly this sentence just a few hours ago, in an interview for  the Polish Radio External Service, so I thought that if I was already prepared to talk about this topic in English, I could write about it on my blog as well.
And believe me, it's really worth reading! I promise you LOTS of eye candy ;-). But first a little introduction.


The Great Orchestra of Christmas Charity
(GOCC, in Polish: Wielka Orkiestra Świątecznej Pomocy) is one of the biggest, non-governmental, non-profit, charity organizations in Poland. Its main objective is protecting health and saving children's lives by providing medical equipment to public hospitals. Every year (since 1993) milions of Poles donate to the GOCC volunteers from all around Poland, who are collecting money on the streets of almost every Polish city. Each year GOCC specialists choose different health issue, ask hospitals what they really need to deal with it, make analysis and then, after the money collection, they buy needed medical equipment. Simple and effective. Almost everyone in Poland knows someone who was treated in a hospital unit equipped fully or partially by The Great Orchestra of Christmas Charity.
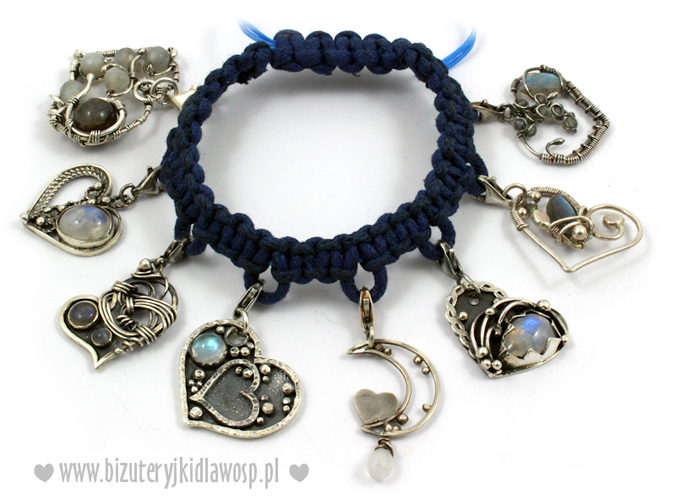
It's already the fourth time when a group of talented people from Poland decided to create totally handmade, collaborative items to be auctioned off for The Great Orchestra of Christmas Charity.
Each year our initiative grows - we make more pieces which raise more and more money. During our first year we made just 7 bracelets, each one consisting of a base and a set of handmade heart-shaped charms - each charm made by a different person. This basic idea is still the same - each project we make is created by at least a few people working together - but the size of our group and amount of projects definitely changed.


This year the group has 500 members, and overall we made more than 70 unique, really precious items.


So let me show you just a few of my favourite pieces created for this year's bidding. Look at this amazing necklace - it's called "Music of the Spheres". You can arrange it any way you want and wear as many elements as you want together, in all possible colour combinations. Someone calculated that there are 6832 ways of wearing it! :-). Each facet of this beaded beauty was made by a different person.This truly is a work of art and heart :-). You can bid it here.
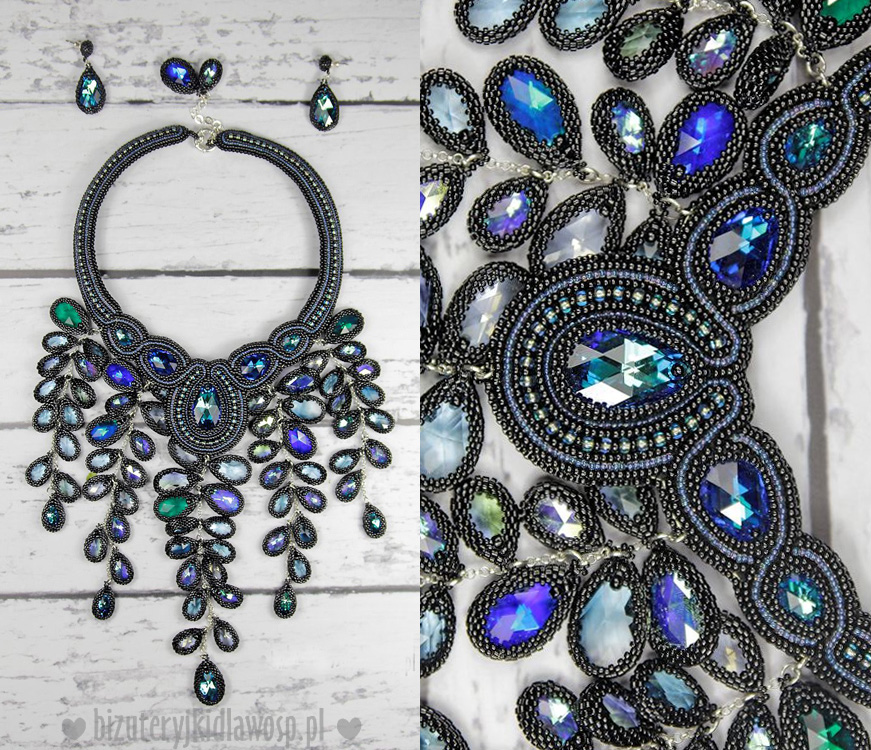


Another beaded and embroidered necklace was made by 39 talented ladies. Not only from Poland - one of them is from USA :-). It's super sparkly but still very elegant and nostalgic. It's called "Rainy necklace". It definitely has this WOW factor :-). 
All the crystals used in this necklace are original Swarovski crystals - 84 raindrops - adorned with Toho beads. You can bid it here.
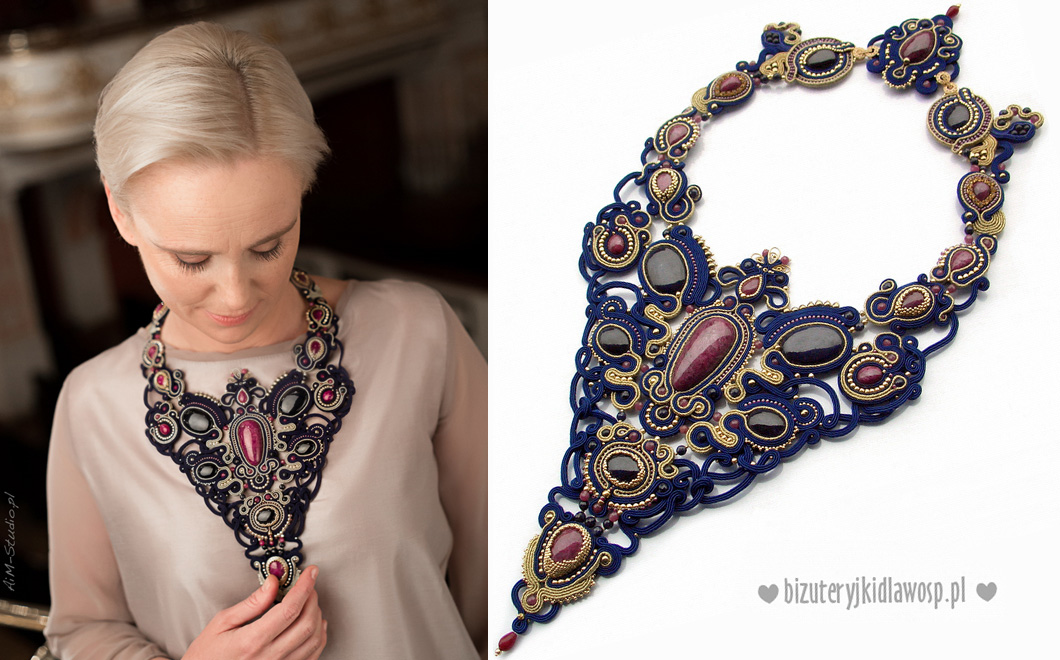


Yet another necklace, but made using a different technique - soutache embroidery - was created by a team of our soutache experts. It's called "Queen Elisabeth" and, in my humble opinion, this is a perfect name for it. It's so beautiful, regal and elegant... It is adorned with natural rubies and sapphires.
I really hope that you already get it, why I am so proud to know some of these talented and generous women and men.
Our model here is a great Polish actress Kinga Preis.


In case you don't like jewellery, we have also a lamp made of thousands of tiny white and silver beads, adorned with snowflakes and spirals - it looks like a dancing Snow Queen and its name is "Magic of light". It was made by 36 people working together. I think this one actually is my personal favourite. I could totally have it in my living room :-).
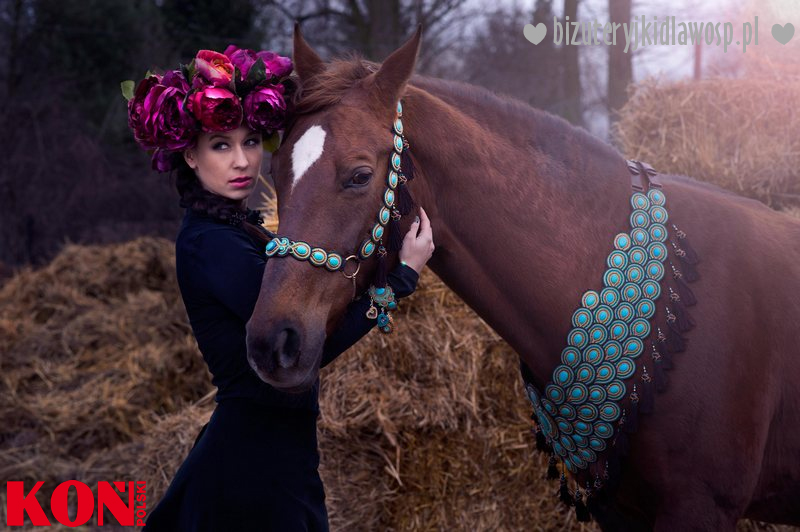


Or maybe you like.... horses? No, we don't have a beaded horse, but... in case you need a cool outfit for your four legged friend, this is yet another thing you can find on our auctions. It's called Al Shamaal - The Warm Wind. I have to admit that when I heard about this project for the first time I thought that it probably was just a joke. Now I can say that it definitely is anything but a joke! Beautifully designed and crafted by 60 ladies from Poland (and United Kingdom!), photographed on a very handsome and patient model.


Another beautiful necklace - "Golden memories" - was created using metal clay and coppersmithing techniques. All these sculpted circles were made by 20 women, during an amazing retreat in Bory Tucholskie - really beautiful part of Poland. Each little circle tells a personal story - just take a closer look.
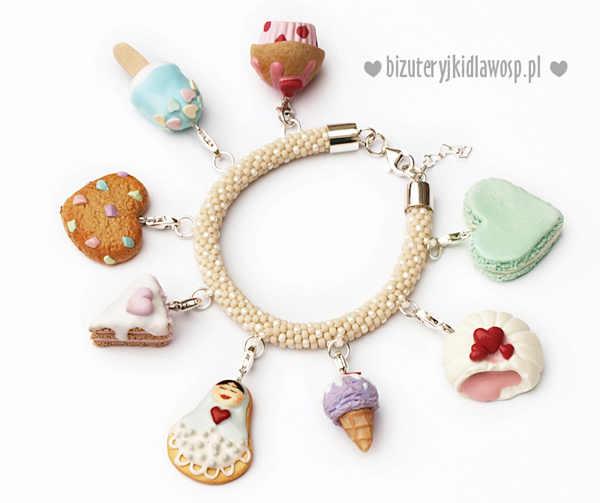


Yet another example of a project made by 10 super talented ladies from our group - bracelets with insanely detailed miniature sweets :-). They are so life like and cute, that it is really hard not to eat them ;-). I have to say that I am also bidding this one. This is probably one of the most popular items on our auctions. These tiny charms are entirely made of different types of polymer clays.


We also have quite a few projects for men, inspired by different cultures. This bracelet is my favourite among them. It was inspired by ancient Greece and made by 10 generous women. I especially love the design burnt on this leather strap. Our model here is Sławek Uniatowski - Polish musician. Photo by gorajka.pl.
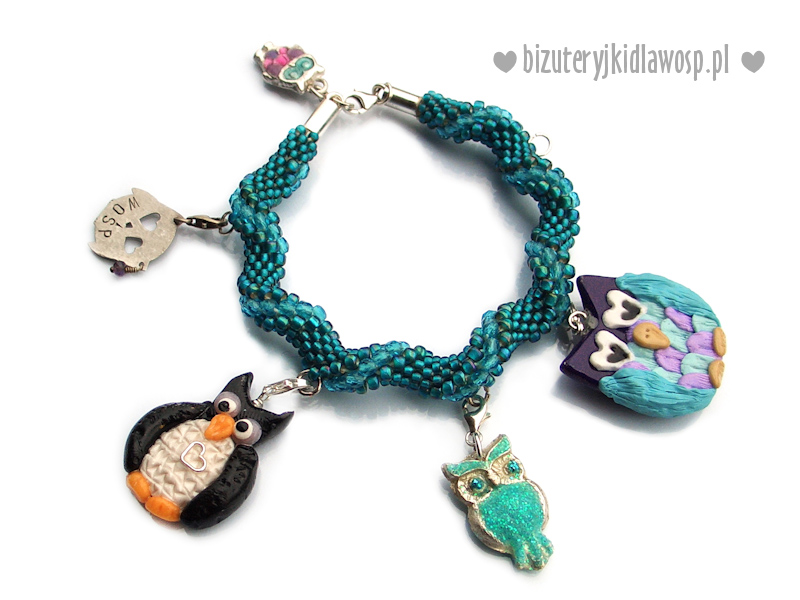


Maybe just one more ;-). This one is VERY special. This year our initiative has also an educational aspect. Younger generation - children of moms from our group - also decided to make a few beautiful things for the auctions. Small teams of girls and boys created together bracelets, key charms and beaded bookmarks. My personal favourite is this bracelet with super cute tiny owls. Probably the most important thing is that this way children learn, that by using their talents and creativity they can help others.
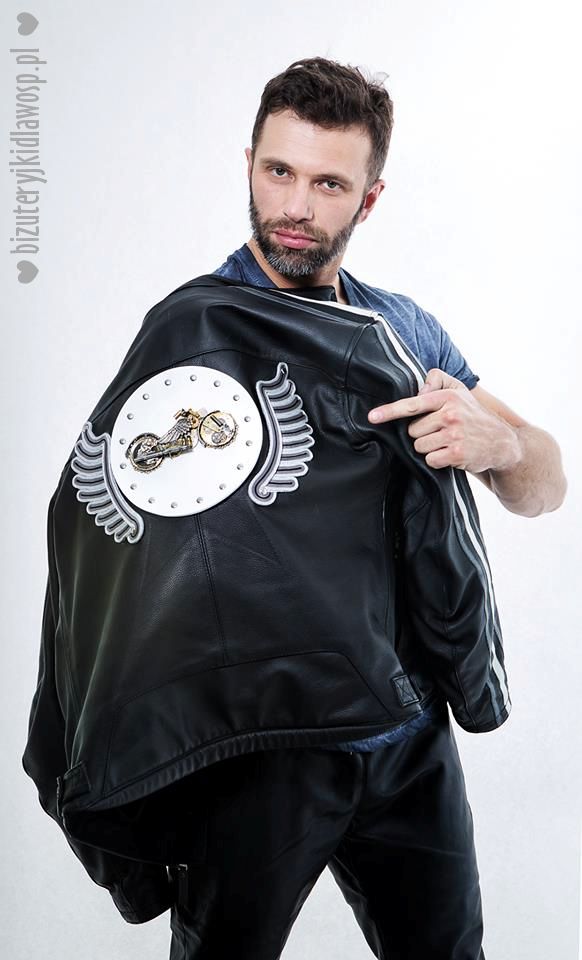


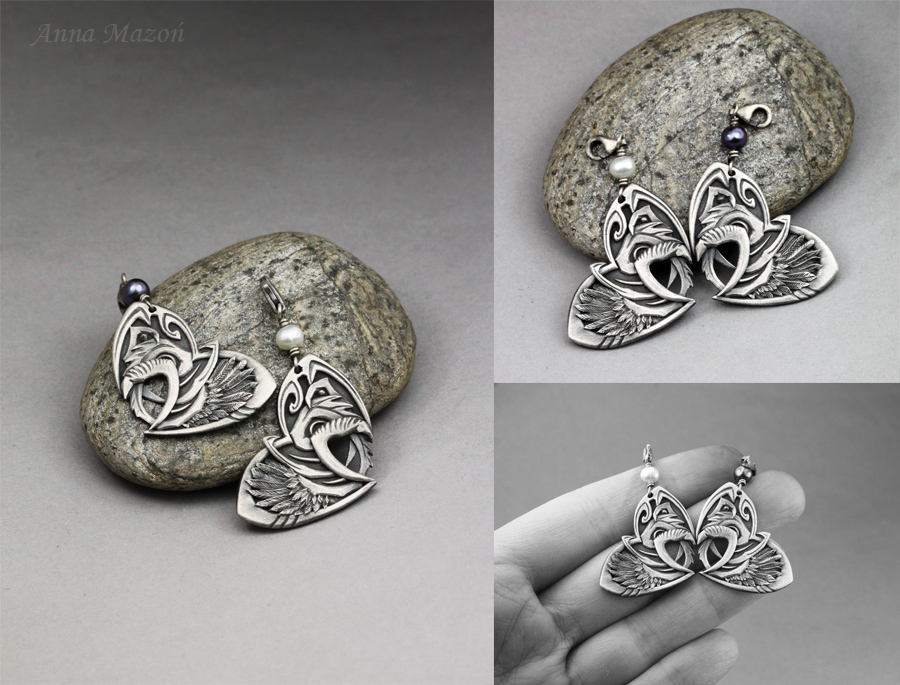
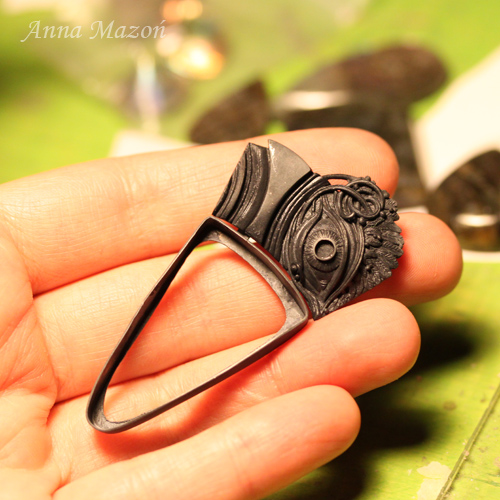
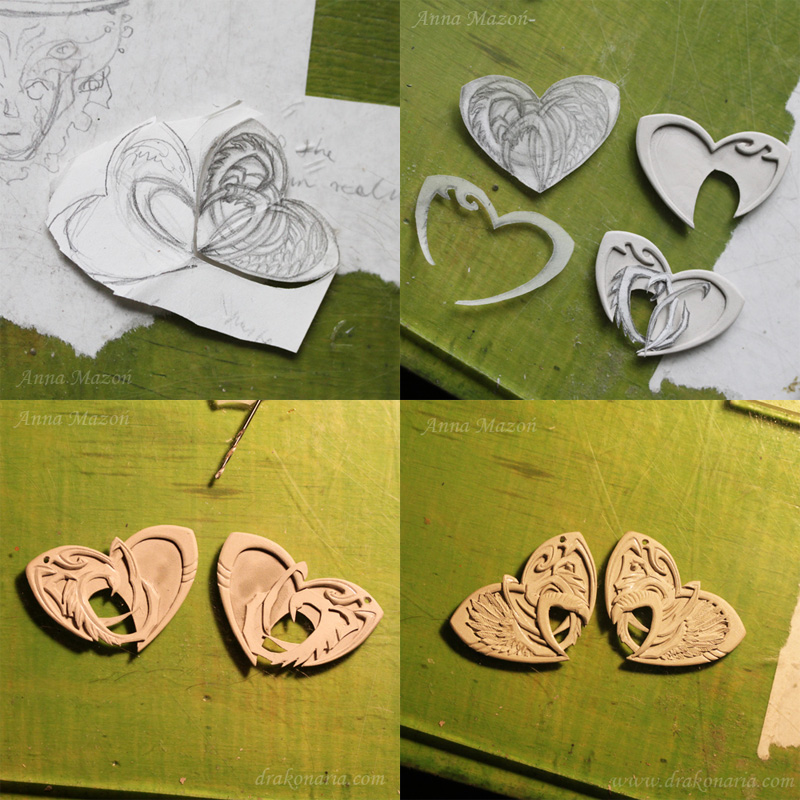
Ok, so let me show you what I made for this year's auctions. I took part in a project called "Wild Eagle" - it's a hand embellished leather, biker jacket, which was donated to us by a former Polish Superbike Champion - Adam Badziak. Our team added to the back of the jacket hand embroidered wings and the lovliest, steam punk stylized motorcycle. I made a pair of heart shaped charms to go with the jacket. It was a quite tough design challenge for me - I've never designed in this style before. Each of the charms is a stylized heart, but when they are put together, two eagle's claws form yet another stylized heart. In a picture below, you can see how I made them.

If you want to see our other auctions ( more than 70 exciting items), use this link:

http://tinyurl.com/itemswithheart


And these are my charms :-).
Ok, that's all I wanted to write today :-). If you read it all I am genuinely impressed! :-) I hope you enjoyed this little story.
P.S. I just saw a video from a backstage of photo shoots of our projects :-D I had to share this - it's wonderful. People who are the models are Polish stars :-). My little charms are also there - with a HUGE motorcycle :-D


Wednesday, December 31, 2014

Around the World Blog Hop

Recently Kim Paige invited me to participate in Around the World Blog Hop. The point of the whole thing is to write a little bit about yourself and your creative friends, share some links, eye candy, and whatever you consider to be worth sharing ;-).
I met Kim last year, during a wonderful retreat in United Kingdom. We spent some great time together and hopefully we will meet again, this time in USA - during Metal Clay Mojo Conference. Kim will have there a talk on social network marketing and I'll be teaching.
Here you can see an example of work by Kim. Jewellery she makes is nature-influenced with subtle textures and simple, elegant designs.

Ok, so lets answer some questions :-)

1. What am I working on?
At this particular moment I have a very special piece in my kiln. It's special, because I started it... almost two years ago :-)))))))))))). It's not an insanely elaborate work of art or something ;-), it's just that I started it before leaving for North Yorkshire, to teach my first workshop abroad ever (it was May 2013), and I lost my way with it. For some reason I decided to make a sea themed piece, and I don't even like water that much. Unless it's a hot shower ;-). But I already made a base, I chose stones, added a few elements, and I felt I went too far to simply scrap the whole thing. Do you know sunk cost trap? It was exactly the case ;-).
I kept this piece on my desk that whole time, just in case I felt sudden urge to work on it ;-). Finally a few days ago, I decided, that I REALLY want to finish it before the end of this year. So, I'll see. Maybe it will be ready, before I finish writing this post. If so - I'll add some final photos :-).


2. How does my work differ from others of its genre?

This is a really difficult question, because there are many people out there whose work convey similar qualities as mine does.
A lot of jewellery makers love heavily detailed pieces. A lot of them create sculptural jewellery. Thousands of people feel inspired by mythologies, folklore and Nature. But I think that maybe this is not the most important thing - the point is to put all these things together and create with what you do, some kind of a narrative coherence.
What I mean is that I hope that the story I tell through my jewellery is unique and differs me from others. It's mine and it feels true, so I am really comfortable with it.


3. Why do I create what I do?

This one is easy. I am definitely a hedonist, so I rather do things that I like than those that I don't ;-). It is as simple as that. I probably should say something like "through my jewellery I am on a quest to change the world" or "it's this weird inner calling, that forces me to create", or PlaceHereAnythingCoolEnough, but the thing is that for me it's simply about doing what I feel like doing.

Changing the world is just a side effect ;-D.


4. How does my creative process work?

First of all sometimes I feel like it is happening ALL THE TIME -  it's even a little bit tiring. It feels as if I had thousands of moving gears inside my head.
I just keep sketching, writing, memorizing ideas, collecting them for later, because I am doing something else at a moment. The most difficult thing is to choose what to do next, especially that for me the most satysfying part of the process is just producing an idea. I could stop there. The ideas are so perfect, and in hard matter always something is not exactly as I wanted it to be.
Many times I start actually making something and my mind already is elsewhere, focused on another idea, which at the moment feels more attractive. I really have to work hard to keep my mind in one place. Another difficulty is to recall that feeling of excitement that was connected to each idea. I have to feel excitement to work. So- when I produce an idea, later choose to work with it and recall that feeling of excitement, I make a proper sketch which I use as a reference.
Then there is some hard work ;-), and I usually end up hating what I made. But I know myself already a little bit, so I leave the piece hidden somewhere at least for a day. When I look at it again later, it looks better than the day before ;-D. I am sure, that these are faeries or something ;-).
Being more serious - it's just about getting some distance from what I made. Sometimes I decide that it's finished and sometimes I alter or correct something. When a piece is done, I feel something like a relieve - it's a very nice feeling. Addictive.


Who is next in the blog hop?


The next person in Around the World Blog Hop will be Lynne Glazzard. I love her work for its contemporary vibe and elegance. I especially adore her enamelled pieces.

I also have a very special place in my heart for Lynne ;-). She was the very first person who invited me to teach in her studio. Since then I taught in many lovely places, met wonderful people and did a lot of super exciting sightseeing.
Make sure you'll check Lynne's work! :-).


Aaaaaand.... Here it is finished :-). Before the end of this year! I called it "Reef Princess". Now, I am off to have some New Year fun  :-).

Saturday, December 6, 2014

Simple pendant with a special touch, AKA, why metal clay is so freakin' awesome ;-)

Of course there is a million reasons why metal clay is so wonderful (and another million why it's not - just like with any other medium :-) ), but what I mean in this case is, that the smallest addition of metal clay can turn boring and very generic piece into something visually exciting. Less than 1 gram of hand sculpted metal clay can raise value of a piece twice, trice or even more.
So, is metal clay such an "expensive" technique (yes, I also hear this all the time)? I guess it simply depends on what you do with it. Of course you can make an "organic" (my favourite word :-P) silver ball, out of 50 grams of clay... It's just about using the medium for what it is the best.

And - by the way - is really "expensive" that important when we are talking about one-of-a-kind, where price of the final piece doesn't really have a lot to do with the price of metal (I am talking about silver or base metals)? Some people say that using a kiln is so pricey - I wonder if they ever made any calculations. I did and what can I say - this just doesn't bother my mind anymore.
Anyway - I guess that what I really wanted to say is, that we, metal clay people, are not a bunch of naive idiots who just can't learn anything else, so we stick to that ridiculously expensive plasticine ;-). It's usually a deliberate choice, which many times leads to very successful businesses.


Well, actually, a few minutes ago, when I started writing this post I had something totally different in mind, but...things happen ;-).

Ok, so just to show a few pictures :-). First I made this tiny element with flowers using silver metal clay and fired it with a few other pieces (because, guess what, metal clay kilns can fire a lot of pieces at once ;-), so the firing becomes even less expensive). Meanwhile I prepared a bezel for the stone and soldered it onto a piece of sterling sheet. I cut out some sheet from the inside of the bezel cup (to save on silver, show beautiful back of the stone, and because I wanted to use that piece of silver later).


I sweat soldered my sculpted piece onto that piece of silver that I cut out from the center of my bezel cup. I soldered a jump ring to the bezel cup, and joined two parts of my pendant.

Wait, soldering, sterling sheet, what? I remember, when I was discussing terms of teaching my Herbarium class in one of the countries I taught in this year, someone said "Why do you want to solder those bezels? The whole point of metal clay is not to solder.". Well, I don't agree with that. The point is to create jewellery using techniques that are the best for what I want to achieve.
This sounds almost smart and serious ;-).
That's why I think that the second most important thing is to keep your mind open and learn new things - whoever you are. The first one is to have fun with what you're doing :-).


Ok, and here you can see the back of the piece before setting the stone, and how both parts are connected. I just cut a strip of silver sheet and formed a bail that also caught the jump ring soldered to the bezel cup. I soldered the bail to the back of the upper part of my pendant, and that was it. Then just oxidizing, some finishing and setting the stone.
From technical point of view this is a super simple piece (and the traditional part took me a half of the day, because I still totally suck at it :-D - practice, practice, practice), but I really learned a lot by making it.

As for other things ;-)- I set up a Pinterest account recently. I am still not sure what's the point of the whole site, but, if you're into Pinterest, here you can find a board with some of my jewellery.


www.drakonaria.com

Sunday, November 30, 2014

I see you ;-) "Startled"

Recently I've been trying to downsize my stash of cabochones, at least a little bit. I solemnly pledged not to buy any new stones, but use what I already have (a TON :-D ). Since then I go over all my stones daily, and each time I find something that is particularly inspiring at the moment.

The thing is, that over the years my work became more sculptural, and usually the focus is on metal, not on the stones. I discovered that it was not so easy for me anymore to design something that features a stone, which is relatively big. I think, automatically, about huge forms, because I feel that there have to be a lot of additional stuff around the stone - I feel that the stone is just not enough.
Yeah. I know - when I said this to myself for the first time I realised right away how stupid this is. So, I decided to push myself a little bit out of my comfort zone, and from time to time focus on the stone and let it lead me wherever it wants. This part is particularly hard for me - I am such a control freak... Anyway - this is one of these projects.


When this cabochon of agate caught my attention I immediately felt very strongly about its pattern and its "energy" (no, I don't mean Capricorn-New Moon-red candle&black cat type of energy ;-) ). I mean that it was timid - those muted hues of purple - so not into your face - but very dynamic at the same time, like something that stares at you from behind the bushes and suddenly realizes that you see it too. Then there is a sudden outburst of movement, UP! UP! To the sky, where you can't reach it.
ekhm...
....
:-)


You can see in the picture above, that I scultpted and carved the upper part of the pendant is silver metal clay. The hardest part was leaving this smooth, raised area - I hate empty spaces ;-). But it just had to be there.

After firing I formed bezels for the stones - big one for the agate and tiny one for a small amethyst.


Then I soldered the smaller bezel...


... and cut out of a silver sheet a shape that became a backing plate for the main stone, and the bail at the same time. I soldered the bigger bezel onto this piece of sheet, then formed c-shaped bails and soldered the whole piece onto the back of sculptural part of my pendant.
It's so dark, because I took this photo after oxidizing and before finishing.


And here is how the front looked like after all the soldering, oxidizing, but before finishing and stone setting.

I called this piece "Spłoszenie" in Polish... I am not sure if this is the best translation possible, but I guess that "Startled" would be the closest thing.


Finished piece looks like this. Of course I am not fully happy with it, I wish some angles (especially the "wing") were a little bit different, but I was really happy with the process itself.  It was different than usually. No sketches, more like "listening" and waiting what comes next. I really enjoyed that.

Ok, and just to share some exciting recent news ;-)
- An interview with me and Christi Anderson, as the winners of "Saul Bell Design Award" 2014, metal clay category, was published on "The Studio" (Rio Grande's blog).
Here you can find the whole interview.
- An article about my newly started collection, "Slavic Tales", was published on "Meet the Slavs" - website devoted to Slavic culture, history and mythology. You can find it here.
Wohoooo and that's it for today ;-).


Wednesday, November 12, 2014

New website! Finally! :-)


I'm so glad I can finally say this: I have a new website! :-)
You can find it in the same place:

drakonaria.com


My previous website was hacked and almost completely destroyed - I couldn't update it in any way, and it took me quite a lot of time to find the right person to build a new one. That's why the old one was still there - looking like a haunted house ;-). The mobile version is still being enhanced, but I am so happy, that finally I can keep my place online up-to-date.

Of course, one of the most important things for me, was the look of my new website :-). I knew exactly what I wanted - a tree motif, a lot of green and fantasy-like feeling, but without too many embellishments. I was so happy when I found this illustration, painted by Maria Gulland. She was so kind, that she gave me a permission to use it as a background of my website. Make sure you check her lovely deviantART gallery :-).


I added to the gallery section a ton of jewellery, that I made while my old website was not functioning properly. The majority is sold, but I just wanted to have in one place all those pieces that I considered worth showing. I also tagged all my creations in a lot of different ways - I love it how you can browse through the gallery using colours, gemstones, collections etc.
I also love this clear and simple menu and general layout.


There is also a section devoted to my workshops (that I want to extend a little bit over time), and another one with my tutorials... And a lot more.
I guess there is no point in describing everything ;-) - just please, visit it, if you are interested :-). Ah, and of course it has both English and Polish version.

I know that the majority of my clients stopped checking this site, because it was basically dead, so now I have to let everyone who might be interested in my work know that www.drakonaria.com is working again :-).

Thursday, November 6, 2014

Flash drive enclosure kit - (mini) test :-)

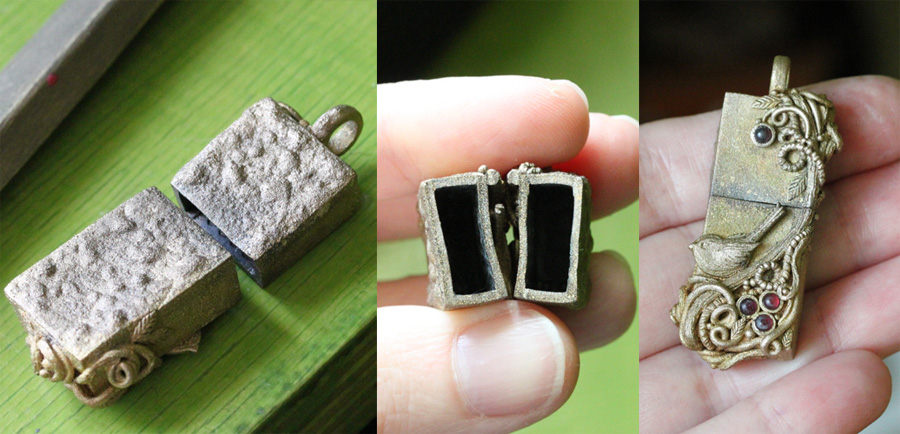
I should have written this post a long time ago (I think I have this kit for a year or so ;-) - I got it from metalclays.com ). I just really wanted to try it with different metal clays, different types of ornamentation and time flew by... So let me share with you a few of my thoughts  and in-process pictures, of using this flash drive enclosure kit. In this photo you can see all three flash drive pendants I made so far. Each one made of different metal clay - Art Clay Silver, Goldie Bronze and Noble Clay (Classic Colour).


Here you can see what you actually get. Two blue parts for making walls of your flash drive enclosure, pink mould for making plugs which help to keep both parts of the pendant from shrinking too much, white investment powder to make the plugs, a magnet (for a closure) and a USB flash drive.
On their website you can also find quite easy to follow, very detailed instruction, and even a few videos.


The first part of the whole process is making the walls. You just have to roll out the clay into that big, blue mould. At this point, while the clay is still in there, you can add some textures - they will be visible on walls of your enclosure. Cool, but I'm really not into textures and I already knew that I wanted to make a sculptural piece, so I just left my walls smooth.
At this point it is very important to follow the instructions about when to remove the walls from the mould, because it really makes a difference (walls fit better to each other). This is also the moment when you realise how much clay this project requires and you start regreting that you decided to make the very first test piece in silver ;-).


After cleaning edges of the walls (honestly this was tricky - I filed them a little bit too much and changed the angle of the edge, which originally was 45°...) you put them together, simply with a bit of paste. This blue cradle makes things much easier. First of all it helps with keeping 90° angle between the walls. You can also notice in the photo that inner surface of each wall has a lot of little holes (they are here to save some clay) and letters, which indicate what goes where - A to A, B to B etc. etc. It takes quite a lot of time to put the whole box together, because ideally after adding each wall you have to wait till the new joint dries.
If you applied some textures on the outer surface of the walls, watch out not to stain them with paste - I had quite a lot of paste on the other side of the seam.


On the side of the cradle, through a little "window", you can check if your walls really fit well together. I have to say I liked this detail.


Here you can see how my first assembled box looked like. It definitely wasn't perfect - the edges weren't super crisp - I had to file them a little bit. I also had to patch a few places with paste from the outside. If I applied a texture on the walls in the first step, this wouldn't be so easy. I would probably destroy the pattern a little bit with all that filing and adding paste.


Then I took out my magic wand, and I made my little elves work... HARD ;-). And here is what they made - my flash drive enclosure was almost ready for firing.
Being more serious - at this point you can embellish your box any way you want. My pendant was inspired by a Norse sea goddess - Rán. I just formed and carved each detail using two of my favourite tools - a scalpel blade and a round, pointy file.


There is one more thing you have to make before firing - the plugs. Just mix a little bit of that white powder with water and pour it into these pink moulds. Now I know that it's a good idea to do this BEFORE you even start working on your pendant. These plugs dry quite slowely and they have to be really dry before you put them inside both parts of  the box.


And here is my flash drive enclosure ready for firing with both plugs inside. You can see a part of the plug in the smaller piece. The second one is almost fully inside. Then  I just followed my usual firing schedule for Art Clay Silver (full ramp to 800° C, hold for 2 h).


After firing and some finishing the pendant looked like this. I was really happy with the final result BUT the thing is, that I had to do A LOT of post firing filing. The plugs didn't really prevent the clay from shrinking too much - the USB flash drive didn't fit in there at all. My theory is that the kit is rather meant for texture-type embellishment, and I added a lot of additional clay on my box. It's probably exactly as it is with rings - heavily embellished, sturdy rings seem to shrink a little bit more than thin, delicate ones. I'm also always aiming for the highest shrinkage possible with my firing schedule - I fire long and hot. It's just a habit connected to the fact, that a lot of my pieces are delicate and openwork, and I need the material to be strong. So - the kit worked ok, but some additional work was necesarry.


Later I decided to test the kit on a different clay. I got a few types of Noble Clay to try, and after one test firing (now I know I should have made more tests...) I decided to make something more serious than just a test strip. Following the instruction once again I made this flash drive enclosure. I have to say, that this time, with some experience from the first trial, it was faster, easier and the result was more precise.


Imagine my disappointment when after firing I saw this... Actually at first I saw the top of my enclosure which was fine, but when I turned it over I saw all these blisters (back was originally flat and smooth). There was also a lot of distiortion. It was very interesting, that the top was ok, but the back was basically melted.


Again - I did a lot of filing, tried to make it straight again (which was super hard), and I left the back the way it was - I just polished it (funny thing is that the person who owns this pendant, actually said that this back looks very interesting ;-) - everything is a matter of taste ). Well - honestly I was quite annoyed, and I haven't used Noble Clay anymore from that moment :-))))))). One day I will - I still have a few packages, but I have to be in a right mood for further experimentation.


For my last experiment with that kit I used Goldie Bronze. The construction of the box was easy peasy this time - I already knew very well how to use this kit.
I added some intricate, sculptural ornamentation, and fired it the way I usually do (350
° C on top of carbon for 1 h, and 825° C for 1 h with more carbon and closed lid).


This time everything went ok, and the flash drive fitted inside - I guess it's because Goldie has such a low shrinkage rate. So here it is ready. It was inspired by a visit in Josephine Wall gallery in Poole, last year.


Ok, so here are my general thoughts:

-
Flash drive enclosure kit is definitely a smart tool.

- Follow instructions really carefully, otherwise it won't work precisely.
- If you fire to the highest shrinkage and /or add a lot of additional clay on top of the boxes, be prepared for a lot of post firing work. The  flash drive probably won't fit inside (I guess in my case I should try with Art Clay Silver that version of the kit, that is meant for PMC, which has higher shrinkage rate).
- The price is high, so I guess I would rather recommend this kit for people who really plan to use it a lot. I saw some wonderful flash drive enclosure pendants, that were adorned mostly with texture sheets and didn't have any issues with too much shrinkage (Inge Verbruggen uses this kit very successfully).

- Yes, it makes things easier and faster, but of course you can construct this kind of a box without help of any kit. It's just about saving time, and not everyone is great with construction.
- Will I use it again? Probably yes. But only with Goldie. I spent too much time filing silver one, and next time I'll just construct the boxes my own way, and make my own calculations, to be sure that after firing everything will fit ok.

Friday, October 31, 2014

Winter Holidays themed challenge

Long time without any posts... I'll try to be a better "writer" this year (well, not so much of this year left ;-) ).
You probably noticed that during last month a lot of metal clay folks posted pictures of Christmas related pieces. Quite a lot of people across Europe got some free fine silver clay (I don't know about other countries, but in Poland it was 20 g) to make Winter Holidays related piece, post pictures of it, write about it, and of course, this way, make some good publicity in social medias for Art Clay ;-). I felt for a moment like a fashion blogger who got some free clothes  (which I wouldn't mind at all );-D BUT - free silver is free silver - you can't say "no" to a material that is simply good :-).

Being me, I wanted to make something related to Winter Holiday, Winter Solstice rather that actually Christmas. But at the same time I wanted to create something that would be easily associated with this time of a year by everyone. Recently I'm really into carving faces of all kinds, so I immediately thought about (a little bit speculative, but beautiful) archetype of the Holly King and his neverending "battle" with the Oak King - winter versus summer. I also chose a stone - seraphinite - it has this particular shade of cold green and distinctive feather-like pattern that to me looks like a frost on evergreen plants. Having all that in mind I started sketching. Yup - my sketches are almost always that awful ;-D.


As you can see at the end I switched for a different seraphinite cabochon, and was still thinking red&green - the most "christmassy" set of colours - but as soon as I carved the face, I noticed that the red is not right shade of red and actually he (the creature) already got his own personality :-). I decided that I would simply see where he takes me with his story. It is so true what Carol Douglas says about all the creatures having their own stories. They simply do. Period.


So I started forming some horns (so once again I reached for a Keeper of the Forest atributes), some flowy ornaments.. Honestly, when I look at the photos right now I wish I stopped here :-)))))))). I just love the shapes around his face... But I kept going - one day I'll learn how to edit myself.


When I was ready he looked like this. He already changed into something different. I switched carnelians and red zirconias for white pearls and white cz - I liked that freezing pallete of colours much more. I also decided that all kinds of evergreen plants would be too much - I just felt drawn to a particular one - mistletoe. So the Holly King turned into a Mistletoe Spirit. This suited him much better, and was definitely related to Winter Holidays with all that symbolism surrounding mistletoe.


When he was ready for firing I realised that I definitely hadn't used all 20 grams of clay, so I decided to make a quick, and rather simple winter-related piece with snowflakes, just to use the rest. And then it turned out that 20 grams is really a huge amount of clay :-))))), because I had to make a third piece - well, this time not related to anything ;-). Usually I don't really control how much clay I use, and I was quite surprised by how clay efficient these pieces were. I weighed them before firing, just out of curiosity. The Mistletoe Spirit weighed 12.4 grams, the one with snowflakes - 4.2 grams, and the one with flowers 2.7 grams.


After firing I did some more traditional work on all three pieces. Whenever I see in my design spots that need extra strenght constructionwise (well, I'm not sure if this word does extist, but I just assumed that if you can say "timewise", than you can say all sorts of Xwise things ;-) And it sounds smart ;-D ), I use regular sterling, soldering etc. The same with very simple elements. In case of this seraphinite cabochon, I just wanted to set it in a very simple setting, and I wanted the sculptural part to move freely under the stone, so there was no point in using metal clay for that. I just made it out of silver sheet. So here you can see the piece after some soldering and before pickling.


And here they are - after all the soldering, pickling, and I already set the stones in smaller ones. Plus some heavy LOS patina of course :-).
Please, don't judge me too hard on my traditional work - I'm just learning :-).


And here are the final pieces: